Sticky creations!

Need a quick and easy activity to keep your LO busy while you finish making dinner? Here is a simple activity that you can prepare ahead of time, there is no chance for a glue spill or colouring on furniture!

Coloured construction paper or card stock are a great backing to make this little craft a little bit more appealing. Refine fine motor skill and get creative!

Cut out a shape from contact paper and glue it onto the card stock with the backing side up. Cut tissue paper into small squares (be creative with the colours you use).

Peel off the paper from the contact paper and give your LO the tissue paper… they can either crumple them up and press them onto the contact paper shape or stick them on flat.

This is a great way to create greeting/eid cards!

Memory…the game that you can’t forget!

A classic game I played growing up that is still around… MEMORY! its a great game and it is so versatile. You can use the pieces in so many different ways depending on the skill you are trying to strengthen.

My LO is almost 3 and is finally beginning to understand the concept of Memory. Turn taking is a very important skill that we are still trying to master and memory is a great game to use for this. Their turn does come fairly quickly and they can see how each persons turn is pretty much the same.

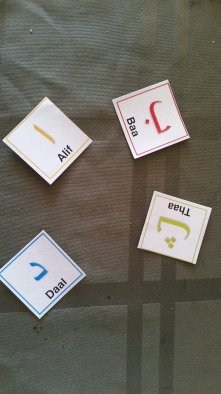
We are learning the letters of the arabic alphabet and so I decided to use these as my memory game pieces.

20160517_095011.jpg

I found a sheet of arabic alphabets online that I printed out and cut up.

20160517_100855

If you have access to a laminator it would be best to laminate the pieces to make them last longer. Another idea to give them some more durability it to stick them onto card stock or poster papers.

20160517_100905

I used juice lids to make my pieces. I used a glue gun to attach the letters onto individual juice tin lids. I hope it gives them some durability.

20160517_123903.jpg

Heres the finished product!

Since 23 letters is a lot to set up for a toddler as that would mean there is a total of 56 cards we used the first 6 letters to begin with, which gave us 12 cards to use total. A much more tolerable number for a toddler. Once those letters are either mastered or no longer interesting we used the next 6 letters. Finding matches with a smaller number of pieces gives my LO higher chances for success  and less frustration!

A second way to play the game is to lay one set of the letters face up on the ground/table (we liked the ground because we could spread them out more and he could move around) then show him a letter from a book or print out that we would like him to find. Giving him the letter sound and the letter name as he searches. This way we worked on specific letters. This game can be played with all kinds of goals in mind like:

  • find me the letters that have a dot on or under them
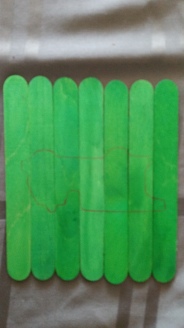
  • find me all the green ones

Another way to play with these cards is to hide them around the house or room and go on a scavenger hunt. As he finds them we tell him the sound.

Putting them into a dark bag or box and having him pull one out and trying to guess what it is, after he looks at it.

You can use any pictures, letters, colours, things, or people to make this game and the fun of making it yourself gives you the freedom to choose things that your child is interested in or things that you would like for them to learn.

DIY Puzzles!

My LO is loving puzzle activities right now so I decided to make a few homemade ones! Of course building on his interests are a major reason why I decided to make my own puzzles and as you will see below, they are small and portable! Puzzles are great skill building activities from strategy, fine motor, and thinking to even problem solving.

I used the thick popsicle sticks… the neutral coloured ones are probably easier to see the picture on but because i was making several of them I used coloured ones in order for us to know which one goes with which.

20160516_115059

First I chose 3 cookie cutter shapes

Then played them onto the sticks to figure out how many I would need to make the puzzle depending on the cutter. The red one (truck) is an easy level compared to the green one (dump truck). Based on the orientation of the cookie cutter on the popsicle sticks you can decide how many pieces and how difficult your puzzle will be. I am experimenting to see if my LO will be able to complete the harder one.

20160516_115234

Remove the shape and tape the sticks together.

20160516_115720

Flip the taped set of sticks over and trace the shape onto the sticks (I used a pencil)

20160516_120114

Outline the shapes in permanent marker and you can add labels if you wish. This is a good way to reinforce letters, letter sounds, and relating words to pictures (the concept that words mean/symbolize something).

20160516_121137

Paint them and there you go!

Once they are dry flip them over and remove the tape. I have put them into individual ziplock bags and put them into my diaper bag for quick and small activities for restaurants, mosque events and any other place he will be sitting 🙂

A Walk in the Park

Since the weather is getting nicer we decided to take a walk to the park near our home. There is a playground and some trees and a fairly large area with grass to play on. Today I thought I would show and talk to my toddler about what we can find in nature … so we played a detective/look and find game. While he was playing on the playground I collected four different items I found on the ground in the park in separate ziplock bags. I found a leaf, a branch, a piece of bark and a dandelion.

20160510_095713

We then started our game! I told him “look what I found on the ground!” do you think you could find some of these things as well? He immediately went to find his favourite item.. the dandelion. It wasn’t long before he was trying to find all the items!

This is a great way to explore nature, giving them a challenge to complete and learning vocabulary and where things in nature come from.

We talked about what bark is and why it is on the ground and not on the tree anymore. And where branches come from and why there were so many on the ground. The best discussion we had was about the leaves and why the ones we found were brown and the ones on the trees were green. A neat observation that I made was that because I chose a brown leaf he walked passed many green ones but did not pick them up until he found a brown one.

Next time I would have put a brown leaf as well as a green leaf in the same bag before I gave him the challenge, this would have been a great opportunity for a discussion. Also another addition could be to have some extra bags and give them to him empty so that he could collect the first one and I would have to find the items he found.

I also used the items I found as sensory items and sensory bags for my infant. He felt them (and tried to eat them!) and was very impressed when I told him the names of the items each time he switched to pick up a different one!

Extension: Talk about what letter each of the items starts with. What do they all feel like? do they feel the same or different? why? What colours are all the things you found? Why are they different colours? Where else would you find things like this?

Discovery Bottle

Waiting at a restaurant…or in a line-up… or for ice cream… or waiting anywhere for that matter. Waiting with a toddler is a challenge on its own. The questions, tantrums, attempts at running, bumping into the people in front of you or repetitively telling you they want whatever it is they are waiting for. These are some of the things you may experience as you wait in a line-up with your 2 year-old. Here is something I have seen on  and many other sites online and finally decided to try it out. A discovery bottle! Building from your child’s interests you can find small beads, or little figurines to add to your child’s personal discovery bottle.

All you need is a clear bottle (many people choose to use glass but I don’t think that is the best choice for my toddler…)

Some small figurines, confetti, buttons, and/or beads

Rice

funnel

hot glue gun

20160507_115213

I measured how much rice i would need to fill the bottle almost to the top and then poured it into a bowl. Added all the embellishments I had purchased and gave it a good mix.

20160507_115350

Using the funnel I poured the mix into a bottle, sealed the lid on and voila! My very own discovery bottle!

20160507_120234

Artwork for gifts

You want to give your family and or friends a personalized artwork gift from your toddler. But lets be honest… they are still developing artists and their skills are far from perfected. Here are a few ideas of artwork that you can have your toddler complete. With a little bit of help but still personalized enough that it looks like toddler work.

20160328_115847

For this card I shaped out the first letter of the receivers name with painters tape and then got MH to paint the whole paper with a cotton ball in a clothespin and once it was done i peeled off the tape and we had an amazing piece of work! Because of the cotton ball painting it also turned out as a textured card!

Moulding shapes out of toilet paper/paper towel rolls is a great alteration to just making circles. A rubber band is an easy way to keep them the shape that you bent them into. We used these shapes to make a painting of shapes!

Another good idea for cards or artwork is to have letter stickers and get your child to either sound out the word/name they are trying to write or you can tell them what letter to find and as they pick them out then help them place them on the card in order to spell out who the card is for.